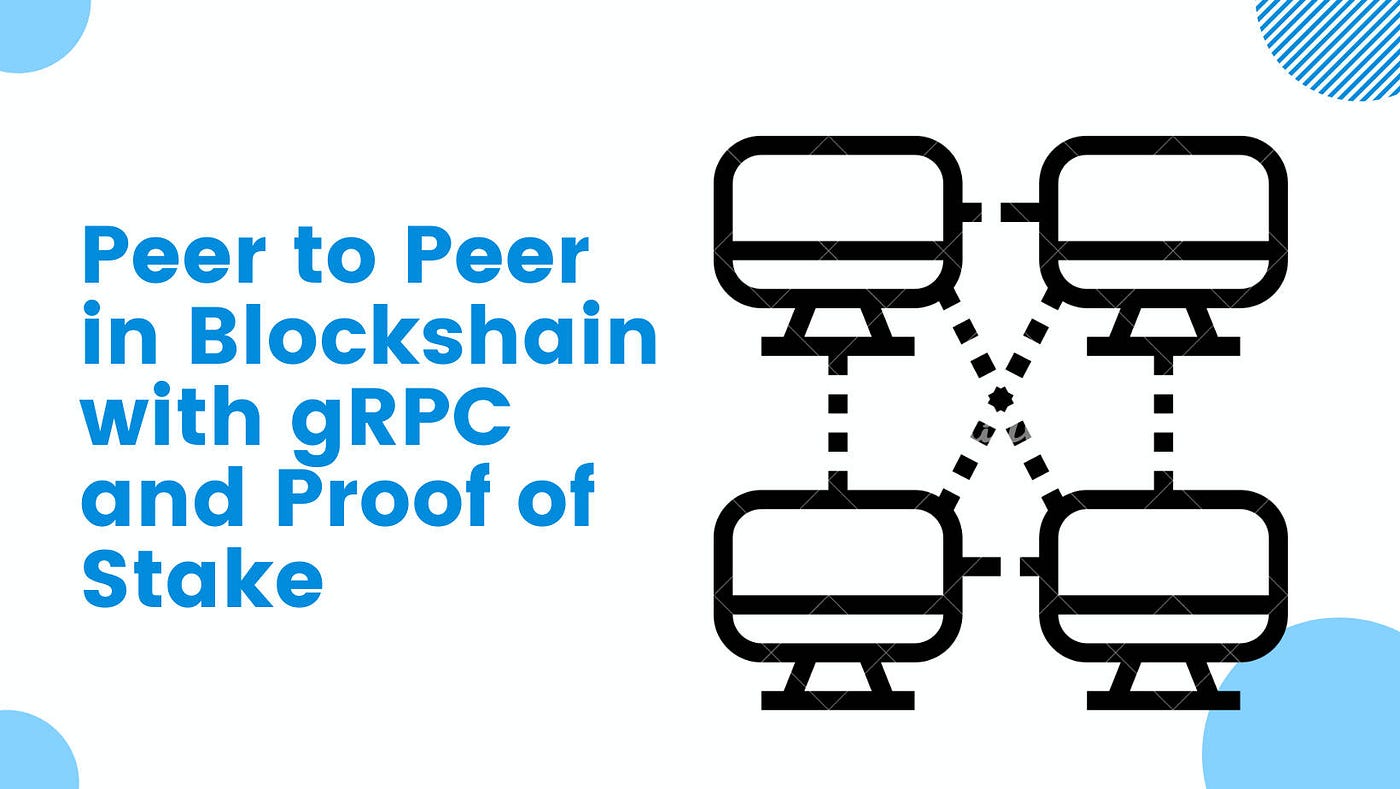
Creating Simple Cryptocurrency using .NET and C# — Part 5. Peer to Peer (P2P) with gRPC
One of the characteristics of blockchain is that it is decentralized, there is no entity governing the authorization of transactions or creation of blocks.
Nodes communicate with each other through a P2P network.
A peer-to-peer (P2P) network is a decentralized communication model between two peers also known as nodes, which can communicate with each other without the need for a central server. In contrast to the client/server model where the client makes a request and the server fulfills the request, the P2P network model allows each party to function as both a client and a server. This means that the network, once established, can be used by the participants to share and store transactions, block, stake, and so on without the help of an intermediary.
To make it easier to understand this article, please read my previous posts here:
If you are impatient and want to quickly see how P2P in UbudKusCoin is, please watch the video at the end of this article.
Some Modifications
Before continuing about P2P, let me inform you, I made some changes to my code to have other blockchain-like features, implement facade design patterns, set up database and proto files, and give comments for each class and function.
- Formating Account address by using base58
- Using Mnemonic as your secret phrase
- Database for each entity
- Proto file for each entity
- Services Pool
Formating Crypto Address by using Base58
Base58 is a character encoding system that is used in Bitcoin to address some issues when using base64.
As the name implies base58 uses 58 characters:
123456789ABCDEFGHJKLMNPQRSTUVWXYZabcdefghijkmnopqrstuvwxyz, it was come from base64 by eliminating characters that can raise misleading also can use a URL link on the web app. Characters that eliminate are:
l (small L),
- 0 (zero),
- O (capital of o),
- I (capital i)
- + and /
Here is the code that I use to formating the address to base58 using the NBitcoin library.
public string GetAddress()
{
  byte[] hash =
  SHA256.Create().ComputeHash(this.KeyPair.PublicKey.ToBytes());
  return Encoders.Base58.EncodeData(hash);
}
Mnemonic
A mnemonic is a group of words, usually 12, 18, 24, or more that are generated when a new crypto wallet is created. A mnemonic passphrase is a crypto-security technique that serves as two-factor authentication. Later on, Private Key and a Public Key are generated based on this mnemonic.
Here is an example of 12 words mnemonic:
talent false scheme daughter erosion leaf nice prefer acoustic confirm copper whereHere are code snippets to generate mnemonic, I use the NBitcoin library for this. The code is here.

One Database for each Entity
In addition to the two points above, I also made changes to the database side, now each entity uses one database, when the blockchain is run for the first time it will create 5 databases, and you can find them all in the DbFiles folder.
Each database is handled by class to perform operations Create, Fetch, Update, Delete data, all classes I put in the DB folder.
One Proto file for each Entity
On gRPC side, I also made changes, I created one proto file to represent one entity, so now there are 5 proto files, services for each entity are defined in their proto file. To find out the existing services can be seen in the proto file. I will not go into further detail about how to create a service in gPRC because it has been discussed in a previous article.
Service Pool
I organize the code to make it easier to maintain, easy for other programmers to understand, and easy to test later. I divided the code into several services according to their function: Wallet Service, Database Service, Facade Service, Minting Service, and P2P Service. All services started on ServicePool.cs.
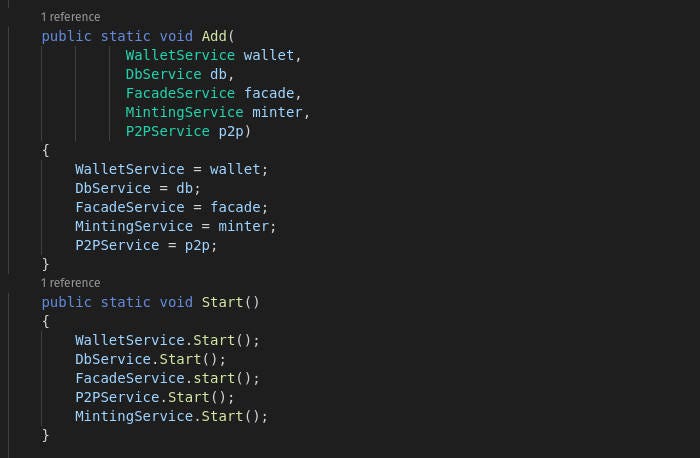
The Wallet service is responsible for creating an account including private key, public key, address, signing. The Database service consists of inserting data, updating, deleting data, and querying, Facade service performs blockchain-related functions such as calculating account balance, creating genesis and new block, transaction processing. The Minting Service serves to make blocks. The Minting service does its job of working continuously on implementing Proof of Stake consensus and triggering block creation and broadcasting. The P2P service has functions to communicate with other nodes: block synchronization, broadcasting block, transactions, and so on.
What will you learn in this Article?
Without further ado, let's get back to our current topic around Peer-to-Peer (P2P). In this article, you will learn the essence of Peer to Peer in Blockchain with Proof of Stake consensus:
- Creating P2P server-side and client-side with gRPC.
- Configure each node using the .env . file
- Broadcasting and validating a transaction
- Broadcasting and inserting a ‘Stake’ to database
- Broadcasting and validating a Block
- Synchronizing Blockchain state
- Proof of Stake Implementation with a simple rule
- Deploy and test UbudKusCoin with 4 nodes, it will be fun.
Imagine you have 4 Laptops (4 Nodes)
To easily understand peer-to-peer and how Proof of Stake works, let’s try to imagine that you have 4 laptops in your home, all laptops are connected to the internet via the same wifi. You install our beautiful UbudKusCoin blockchain on all laptops and then you run it. All 4 laptops we call nodes, laptop1 is node1, laptop2 is node2, and so on.
Think again, when one node creates a block, the block has to be copied to another node, so the number of blocks in all nodes is the same and the blockchain is identical, can you imagine it? If node4 creates a block, it should be copied to node1, node2, node3.
The question is, how to copy a block from one node to another?
The answer is to use P2P networking. The node that creates the block must broadcast (send) the block to other nodes.
Peer-to-peer (P2P) Networking with gRPC
To implement P2P on UbudKusCoin, I use gRPC instead of Socket, Websocket, or REST API. After some research here are some reasons why I use gRPC: First I don’t want to add any additional libraries besides the existing ones, secondly gRPC messages are serialized using protobuf which is fast on both the client and server-side, thirdly it is easy for me to build by defining it on .proto files and fourthly gRPC is designed using HTTP/2 which has a better performance compared to HTTP 1.x.
Within gRPC implementing P2P is easy, we already have proto files, that we can use to generate gRPC client and server. We just need to modify the line code in the Projets file UbudKusCoin.csproj and set the GrpcServices properties values to Server, Client.

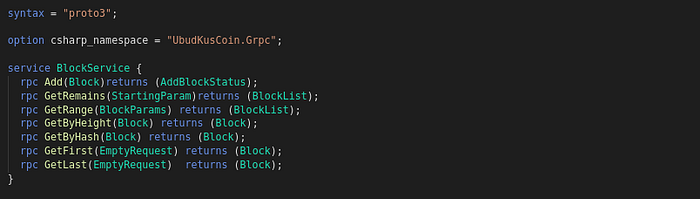
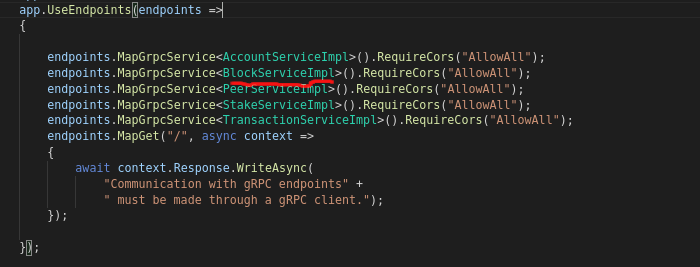
P2P server
Implementing a P2P server with gRPC is quite simple, just extend the services that are defined in .proto files. As an example, below is services that define in block.proto file. Let’s look at one service Add(block) service on the first line of BlockService that I made for receiving a block from another peer.
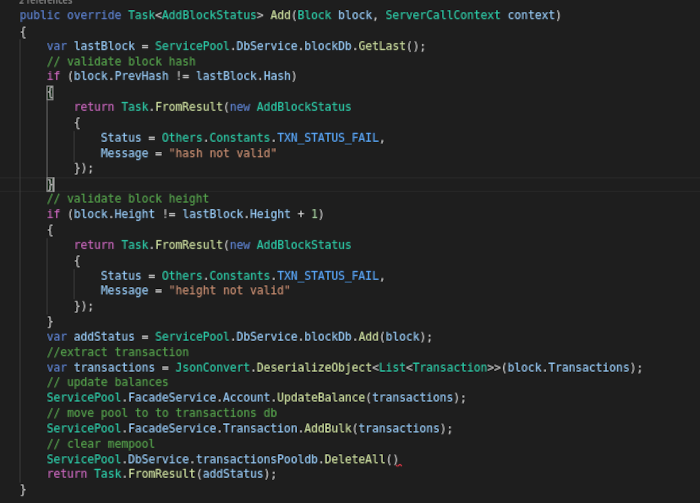
And below is the implementation of the Add(block) which can find in BlockServiceImpl.cs
Finally, start the service by including it in a startup.cs file.
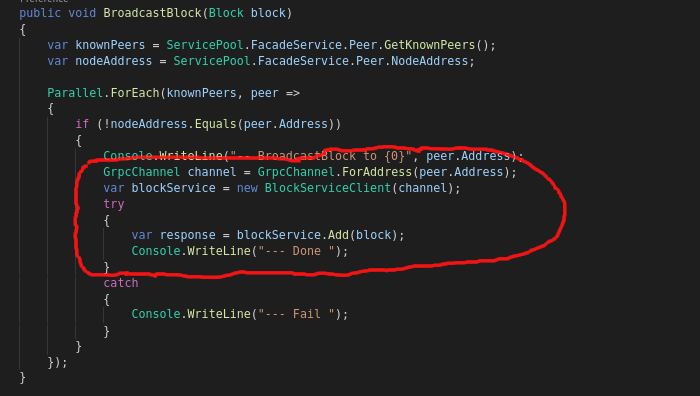
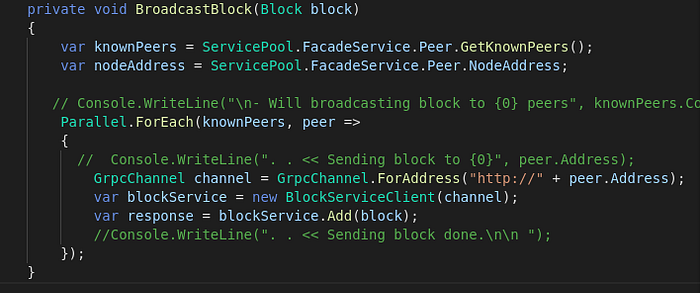
P2P Client
How to make a P2P Client with gRPC? It is also simple, first create a channel with peer URL as a parameter, then call service and call the function.
Below is the code for the broadcasting block to all peers, see at the red line.
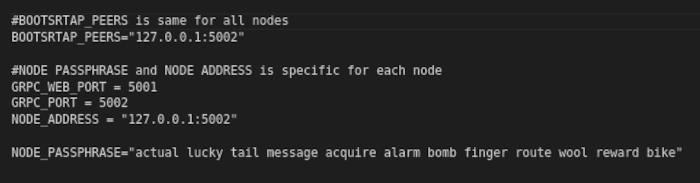
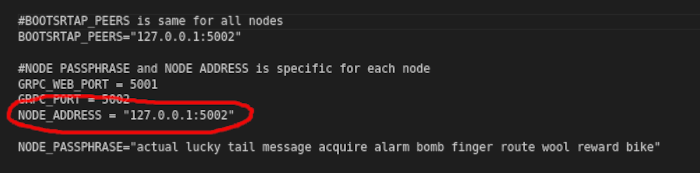
Environment Variables with .env
Each node must have its own configuration file to accommodate variables that are specific to that node. One node with another node is unique, has its own identity. I use the .env environment variable for this purpose. In the .env file, we define the GRPC_PORT, NODE_ADDRESS, BOOTSTRAP_PEERS, NODE_PASSPHRASE, and other variables that can be added later.
Network Address as Node Identity
As you know every computer in a computer network has an IP address, one computer can connect to another computer if they know the IP Addresses of each other.
Likewise in the Blockchain world, a node can send or receive blocks, transactions, messages from other nodes because it already knows the IP address of the other node. We find out a way how to record the IP addresses of another node.
Let’s create a variable named NODE_ADDRESS in the .env file and enter the IP address of the laptop where the Blockchain application is installed.
Later on, this IP address will be informed to other nodes.
Passphrase/Private Key as Node Identity
In proof of stake, each node must stake some coins to participate in block validation. When staking, the node will send a transaction that includes the number of coins staked and the account address.
The node that emerges as the winner will sign the block and include the signature in the block. To achieve that goal we need a private key or passphrase for each node, here is the configuration on .env.

Let's look at block information of PeerCoin, I take from PeerCoin Explorer here. There is information about block signature below.
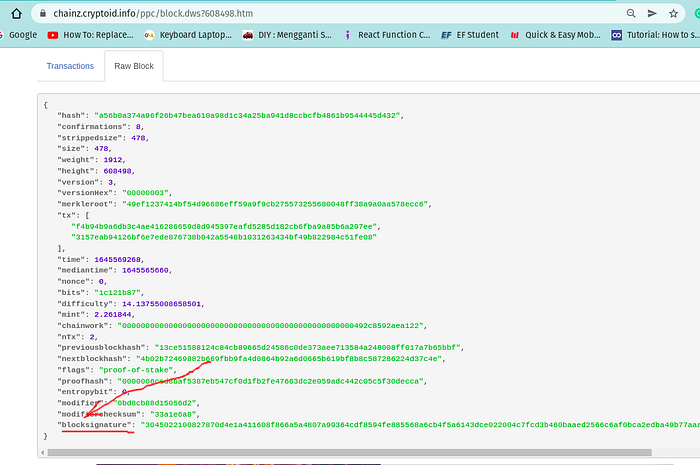
Until here I hope you can imagine, why we need NODE_ADDRESS and NODE_PASSPHARSE for each node in each laptop.
I have made four .env that you can use for testing later. You can find all .env here.
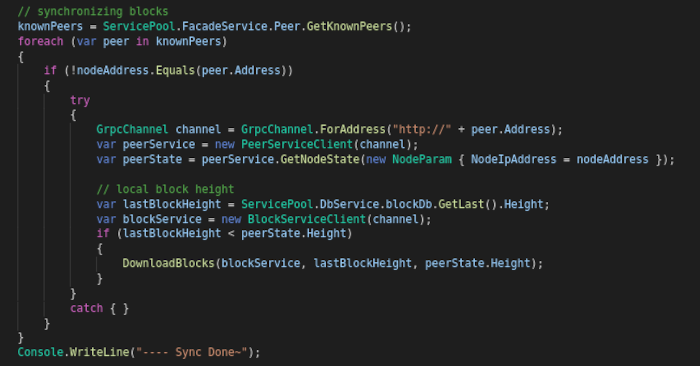
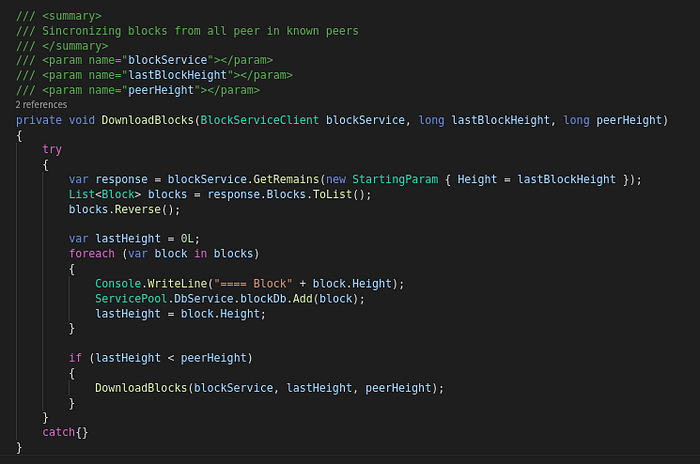
Synchronizing Blockchain State
In the real world, all nodes in a blockchain network must have the same block height and same block hash. How to achieve that? When a new node is created and started, it must synchronize itself with other nodes that have been running longer.
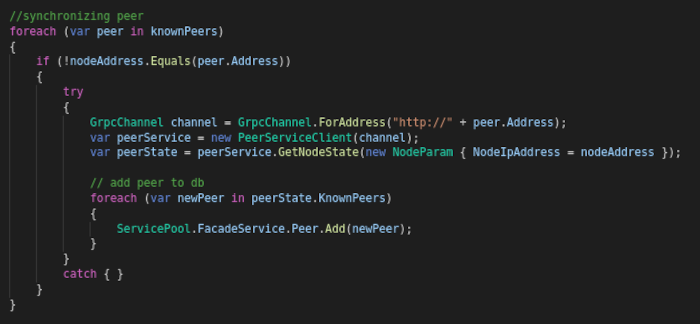
Code below is part of P2PService.cs, you can see GetNodeState service called to get blockchain state of other Nodes. The service will return a List of known peer and block heights of the node that was contacted.
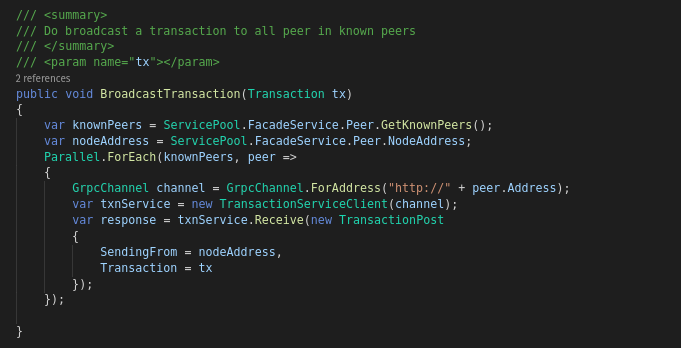
Broadcasting Transaction
Let’s back to four laptops. Imagine you go to laptop no 3, you open the Console Wallet app and you transfer coins from address A to address B. What happened? The transaction pool of node3 in laptop 3 now has 1 transaction, but the transaction pool for laptop 1, laptop 2, and laptop 4 are empty. Yes, we must copy transactions from laptop 3 to another laptop, all laptops should have the same state of transaction pool.
The broadcasting transaction in the blockchain is sending the transaction to all nodes (computer) in a blockchain network, so all nodes have the same state of transaction pool.
Why does it matter? we don’t know which node will make the next block, so we make all nodes have the same state of transaction pool.
Here is the function BroadcastTransaction that broadcasting transactions to all nodes in the blockchain network.
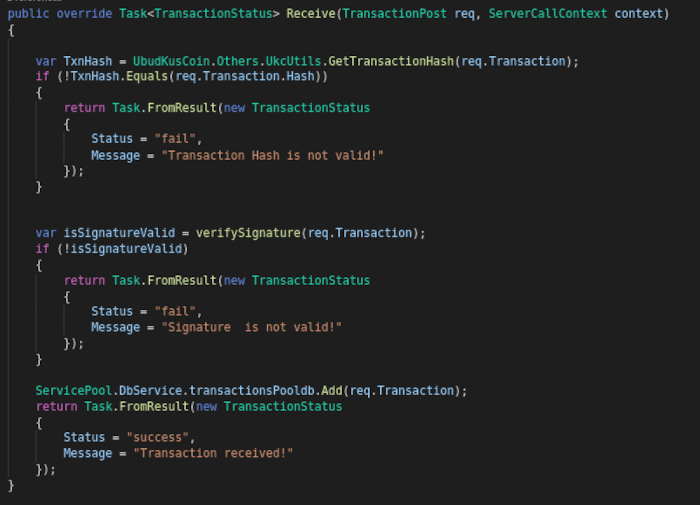
Validating Transaction
When a node receives a transaction, the node must validate the transaction such as checking hash and signature.
Broadcasting Stake
In this article, I make an auto stake with random amounts to simulate the stake activity. I hope you can catch my idea.
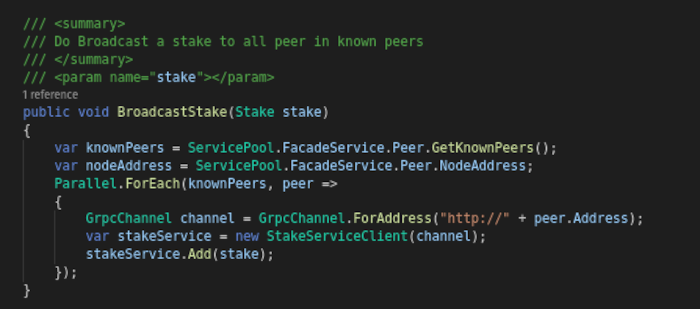
Broadcasting Block
After the block is created in one node by a validator (winner), it will be broadcast to other nodes in the network, to make other nodes have the same blockchain state. Below code for the broadcasting block.
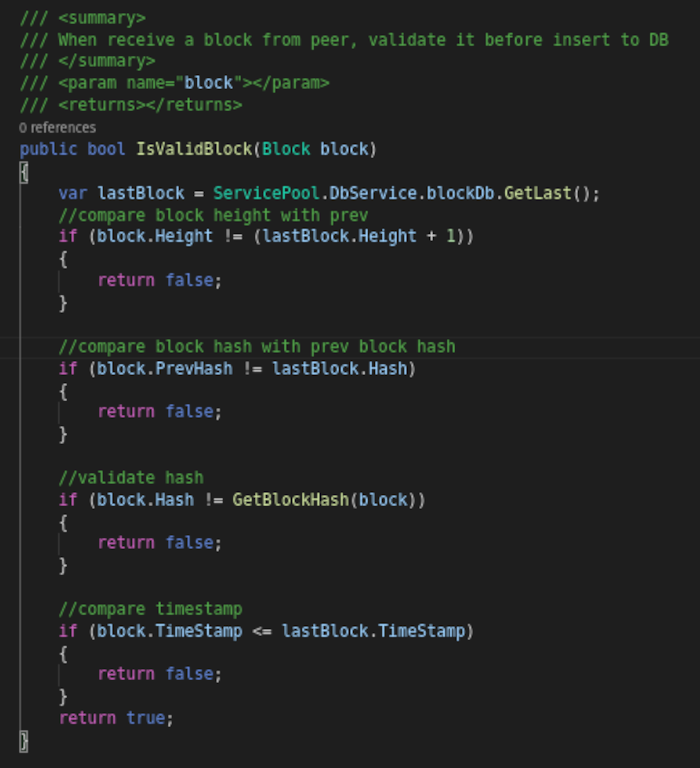
Validating Block
When a node receives a block from another node, it must validate the block before entering it into the Database. Here is the code to validate the block. As you can see in the code below, it will first validate the block height, validate the block hash and the block timestamp.
Proof of Stake Game
I guess you already read many times about Proof of Stake, what its pros and cons about it. I am not writing about that here.
I will make it simple, If someone wants their node to participate as Block Validator the node must follow the Prof of Stake Game rule. The node must be staking some coins.
Proof of Stake is a concept, there are several implementations out there.
In this article, I will create my simple Proof of Stake Game rule, so easy for beginners to understand, later in my next article, I will make it advance similar to live crypto out there.
- A node must stake some coin to participate validate a block.
- Blocks will be created every minute. The block creation schedule is at the 45th second
- Staking can be done before the block creation time is made.
- Staking will be removed after the block is created and the nodes must be re-staking.
- The winner is the node that stakes the most coins.
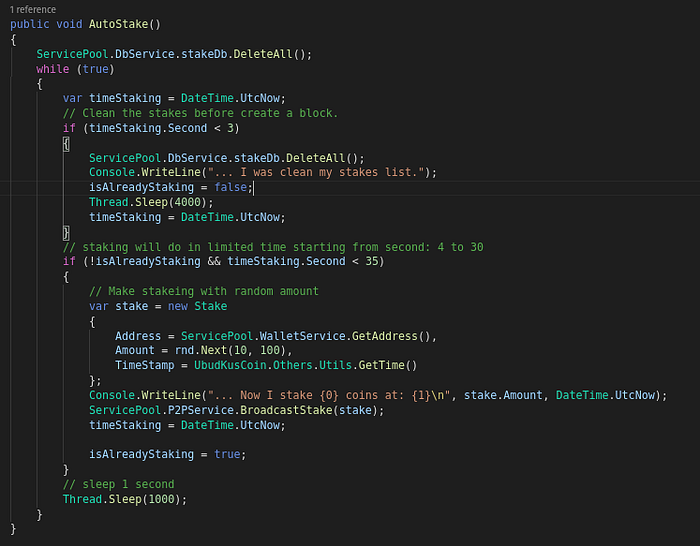
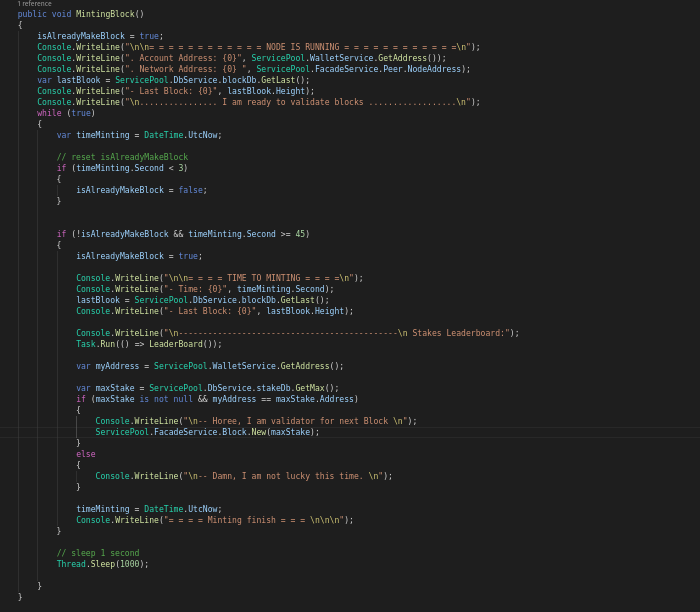
Below I created the code to apply the above rules, the full code is in MintingService.cs.
The code uses a while loop, checking the current time and taking the seconds part of that time. If the seconds part is < 3 then isAlreadyMakeBlock set to false.
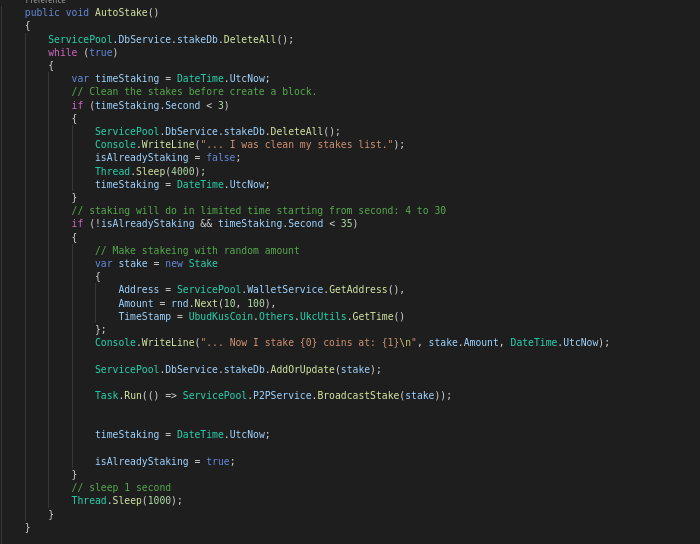
While the printing service is running, AutoStake is also running, to continuously stake from the 3rd second to the 35th second, and broadcast stakes to other nodes.
Block Minting and Auto Stake run nonstop, it will create a block each one minute and also send (broadcast) the Stake to another node.
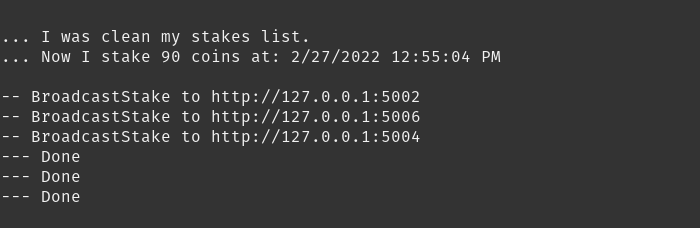
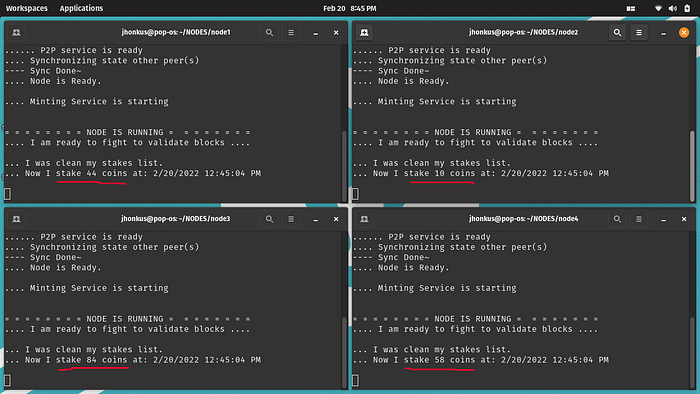
Staking Time
Below is the screenshot of when a node makes staking and broadcast it to other nodes. This is node4 broadcasting stake to node1, node2, node3, check the IP address.
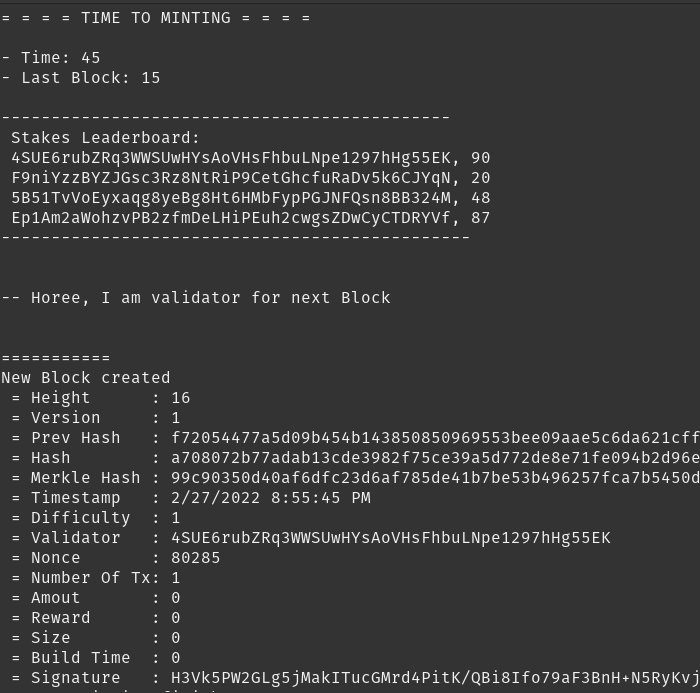
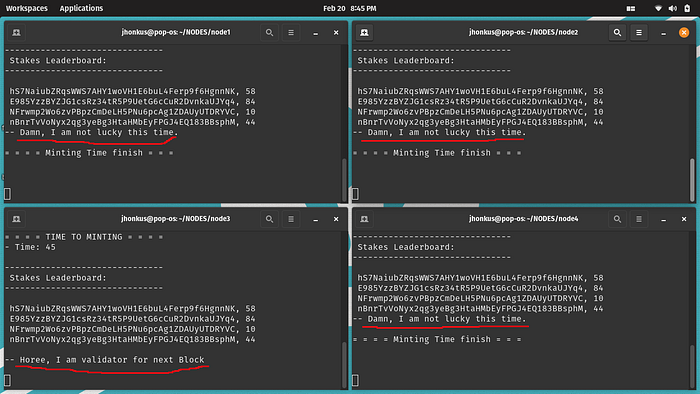
Minting Time
Below are screenshots when minting time come, it will display a list of stake and their amount. All nodes should have the same leaderboard.
This screenshot is at the block height of 14. It says ‘Damn, I was unlucky this time’ no luck making a block.

Below is a screenshot of a block height of 15. One of the nodes wins, it says ‘Hooray I am validator for next block’ and then the node creates a block and broadcasts the block to other nodes.
Show Time, Testing P2P on 4 Nodes
I try to make my articles easily understood, explaining in detail, giving some screenshots.
Step by step running UbudKusCoin with 4 Nodes:
- Publishing/building the project, making distributable binary files of UbudKusCoin
- Create 4 folders that act as 4 laptops
- Copy binary files to all 4 nodes
- Make .env files to all nodes.
- Open terminals to run 4 nodes
#1. Publishing Project
I mostly used Pop Linux when developing UbudkusCoin, so I used the commands for Linux, if you are using Windows or OSX, follow the commands accordingly.
Here is a command for Linux:
dotnet publish -c Release -r linux-x64 -o ./publish-linux The above command will make binary files on the publish-linux folder.
It is a command for osx:
dotnet publish -c Release -r osx-x64 -o ./publish-osxIt is command windows:
dotnet publish -c Release -r win-x64 -o ./publish-win64#2. Create 4 folders that act as 4 Nodes
The next step is to make 4 folders that act as 4 nodes.
- At home folder, Let’s create folder NODES
- Create 4 subfolder: node1, node2, node3, node4 inside the folder NODES
#3. Copy Binary Files to all Nodes
Copy all the files generated in step no 1 which are in the publish-linux folder, to the node1, node2, node3, and node4 folders, all nodes have the same binary files.
#4. Create .env files in All Nodes
Create an .env file for each subfolder (nodes). I have created 4 .env files which are in the env-examples folder. Please use the file as a reference and modify it according to your needs.
So now we have files like this.
~/NODES/node1/.env
~/NODES/node2/.env
~/NODES/node3/.env
~/NODES/node4/.env
#5. Open terminals for 4 nodes.
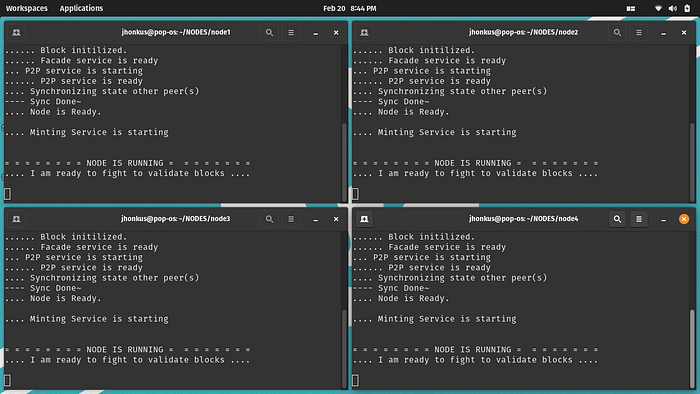
Let’s open 4 terminals and arrange them like the screenshot below. One terminal is one node. From left to right node1, node2, node3, and node4, you can read the folder name on the screenshot.
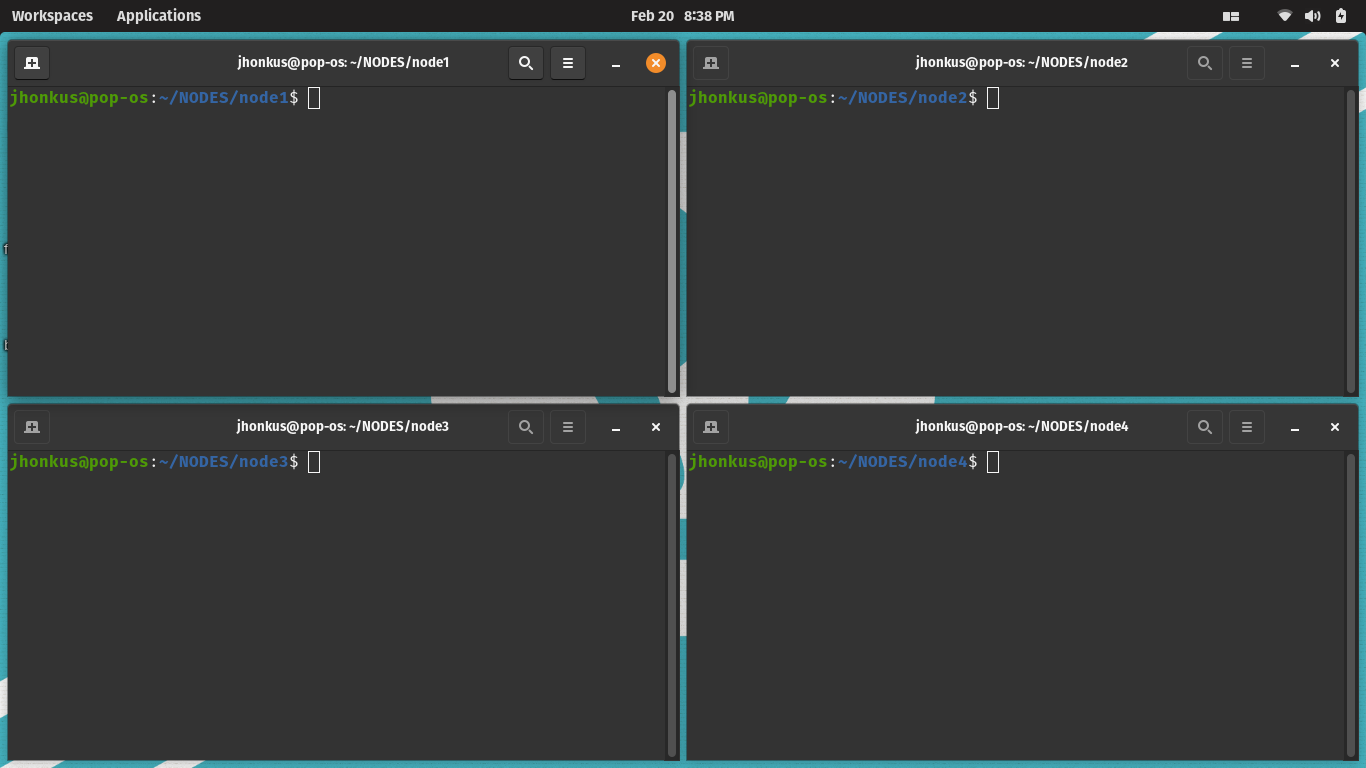
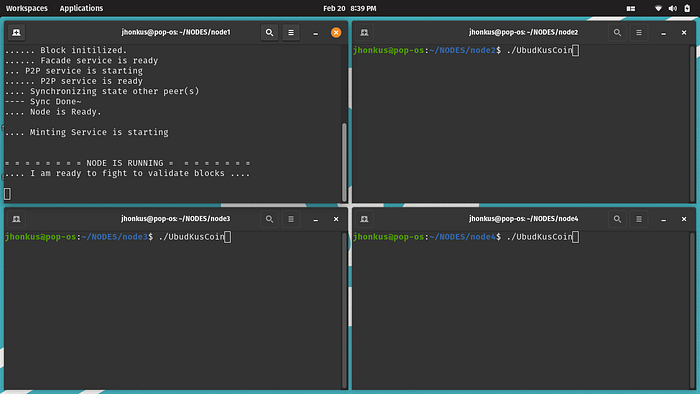
Start from node1, on terminal one type this:
cd ~/NODES/node1
./UbudKusCoin
You will see all services started, Give time to node1 to create some blocks.
Now run node2, on terminal no 2 types this command.
cd ~/NODES/node2
./UbudKusCoin
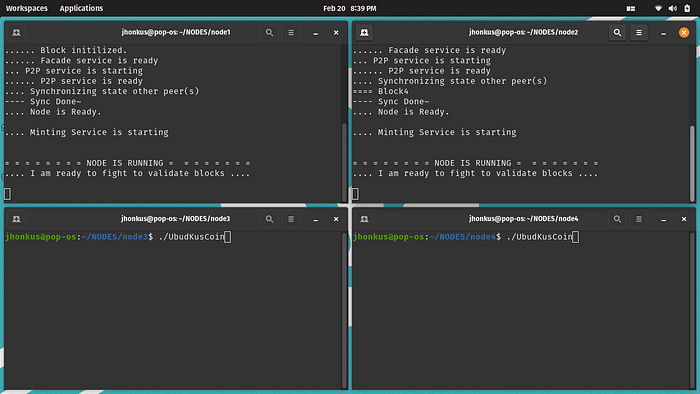
Next, run node3 and node4 in the same way as above.
Perhatikan garis merah di bawah ini, ini menunjukkan jumlah koin yang dipertaruhkan oleh setiap node.
Notice in the red line below, a node will come out winner to make a block, another node does not make a block.
I make videos on youtube, I hope this video can help you, how to test P2P and understand how Proof of Stake works.
For more detail Step by Step build and run UbudKusCoin please read README in GitHub repo here.
What is next?
In the next post, I will refine the logic for Proof of Stake, so it has features like Blockchain that uses Proof of Stake consensus.
Post List:
Source code for this post:
https://github.com/jhonkus/UbudKusCoin/tree/part_5_p2p
Thank you for reading my post. If this post is helpful please give me a bunch of claps.